I spotted a totally different kind of wreath –made from book pages– somewhere on the web and decided I needed one! So I ran over to a local thrift store, found a 900 page novel for $0.75...great deal deal right!? I also had a foam wreath, a glue gun, and paint so this whole thing was soooo thrifty! Here are a couple of photos of my wreath in process as well as the finished product. I tend to be a slight perfectionist so my wreath is pretty darn structured, but they don’t have to be. Below is my tutorial so read on and enjoy!!
Just gather a few supplies and you are on your way to creating a very fun wreath...
-Foam wreath...any size will do depending on how big or small you want it to be.
-An old book
-A glue gun
Step 1:
The first thing I did way spend a few minutes—38 to be more exact—ripping the pages out of your book. I made sure I got a book that I wasn’t at all interested in…sorry to the author but I promise it is going to a good cause! J
Step 2:
Start by lining the back of your wreath with rolled pages. It will look similar to this. You will want to put some glue in between the pages as well on the front. Try to glue these pages so the wreath will hang flat against the wall.
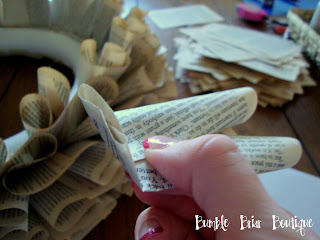
Step 3: After you line the entire back you get to start on the front!!!! YAY! One step closer to the finished product. For the front just roll the pages again and glue them around the wreath one layer at a time. When you start to glue these pages, just crease the end of the rolled page and you have a little tab that makes gluing the pages tons easier.
Oh, here are some examples of how you can roll your pages. How you roll them really just depends on how you want your wreath to look.
This is what a few layers look like…so close to being done!!
Step 4: After you get a few layers going you can start to glue some pages to the inside of the wreath. You will use the same technique as you did when you glued the very back layer.
Step 5:Here is what my wreath looked like after I finished the inside. You can still see some of the foam so now all you need to do is start filling in the pesky empty spaces. Fill until you are completely satisfied with your final product.
Looks so great all filled in!!!
Sorry I didn’t get a photo of this step but it should be fairly straight forward. So now that you have this amazing new wreath you need some way to display it. I chose to hang it on the wall to give it a little life. What I did was just glue a piece of ribbon of the back. Luckily this is not a very heavy wreath so the ribbon stays put well.
Step 7:
Display the amazing new wreath!!!!
I love that this project is so simple and so inexpensive but still looks great! Try it and see how you like it. I would love to see what you come up with. J


0 comments:
Post a Comment